Chapter 4: Permissions and Safety
This is the most important chapter in the book for a clinician audience. If you skip every other chapter, do not skip this one. The reason is simple: every other chapter teaches you to make Claude Code do more. This chapter teaches you what to keep it from doing. In a hospital environment, the second of those is the one that matters.
The framing is the same one you use in clinical practice. You do not give every clinician root access to every record in the EMR. You do not let the new pharmacy resident override the dose-limit checks on day one. You do not allow git push --force for the same reason you do not allow telephone verbal orders for chemotherapy. The safety rails exist because human-or-machine error, given write access, eventually becomes patient harm.
🧠 Remember. Claude Code is an agent. It can write files, run programs, push to remote servers, and call paid APIs. Every one of those actions can also be wrong. The permissions system is the layer that catches a wrong action before it becomes an incident.
What can actually go wrong
Before we talk about how the safety system works, consider what it has to protect against. The following list is not theoretical. Every one of these has happened to someone using Claude Code in the past six months, at multiple institutions:
- Deleting files. Permanently. There is no recycle bin in the terminal.
- Overwriting working code with broken code that looks plausible.
git push --forceto the main branch, erasing teammates’ commits.- Dropping a database table.
- Sending an email to a real address, from a script that was supposed to be a dry run.
- Calling a paid API in a loop a thousand times, generating a bill.
- Reading a
.envfile (the file that holds your API keys and database passwords) and helpfully including its contents in a commit message that ends up on the public internet.
The permissions system exists because every one of these is one careless prompt away.
How the default protections work
When you first install Claude Code, the system runs in default mode. In default mode, before Claude does anything significant — write a file, run a shell command, hit the network — it pauses and asks you. A small panel appears that shows you exactly what is about to happen (“Claude wants to use Bash to run npm install lodash. Allow?”). You answer yes or no.
🧠 Remember. The default mode is “ask before doing anything that touches the world outside this conversation.” That is the right mode for you to start in, and the right mode to stay in until you understand exactly what you are being asked to approve.
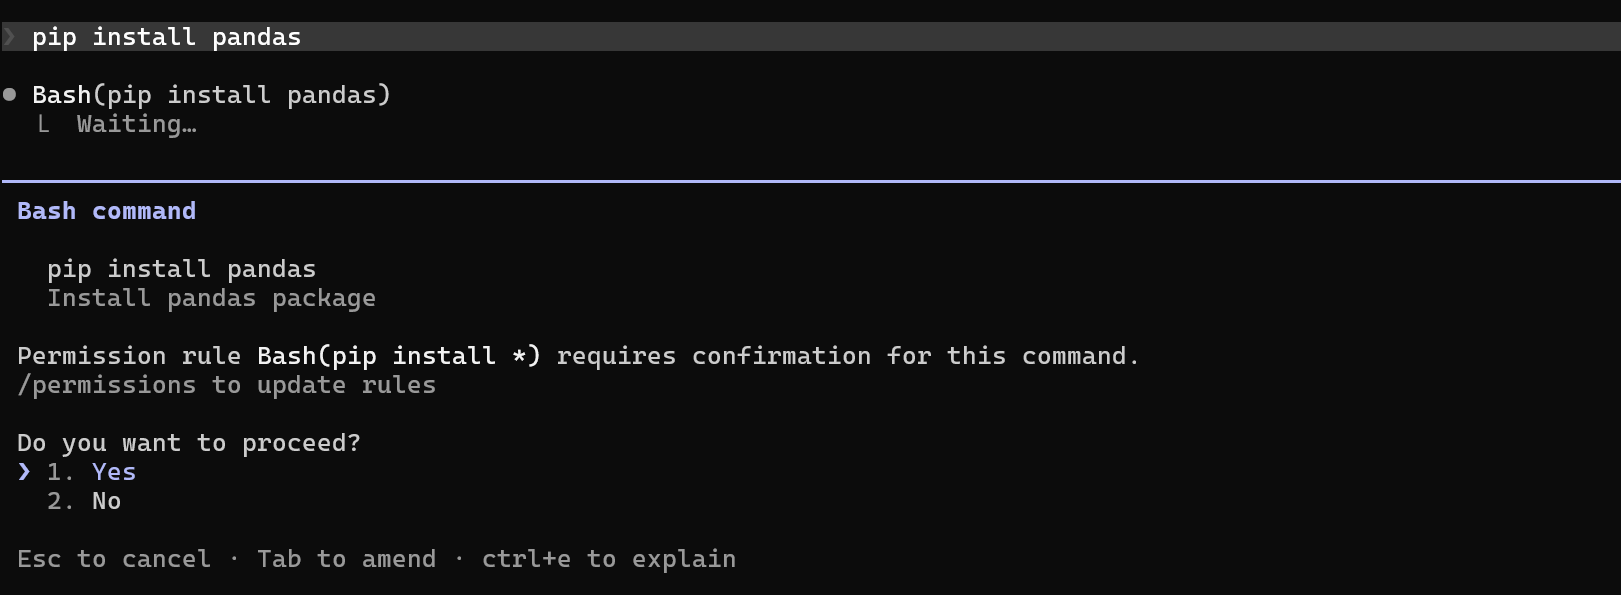
git status command, with Yes / No / Always optionsAfter about an hour, you will notice the cost of default mode. Claude wants to run pytest. You say yes. Claude wants to run git status. You say yes. Claude wants to read a file you obviously want it to read. You say yes. The interruptions kill flow. This is what experienced users call the approval tax.
The fix is not to switch off permissions. The fix is to pre-approve the actions you trust, while keeping every other action gated.
settings.json: the rule book
The way you pre-approve actions is through a file called settings.json. The name needs unpacking. JSON stands for JavaScript Object Notation — it is just a format for writing down structured information in a way that programs can read. It looks like a series of labeled lists between curly braces. You don’t need to know how to write JSON from scratch. You only need to know that settings.json is a plain text file, with a strict format, that Claude Code reads on every session to decide what is allowed and what is not.
settings.json lives inside a folder called .claude/ at the top of your project (the leading dot makes it a hidden folder; some file browsers don’t show it by default). It works the same way CLAUDE.md works in later chapters: a small file, checked into your project, that customizes Claude’s behavior — except this one is about safety, not style.
Inside Claude Code, type:
/permissions
A panel appears that shows three lists:
- Allow — actions Claude can take without asking.
- Deny — actions Claude is forbidden to take, ever, even if you tell it to.
- Ask — the default catch-all for anything not on either list.
You can add entries directly through the panel, or you can edit .claude/settings.json by hand. Most people start with the panel and graduate to the file when their lists get long.
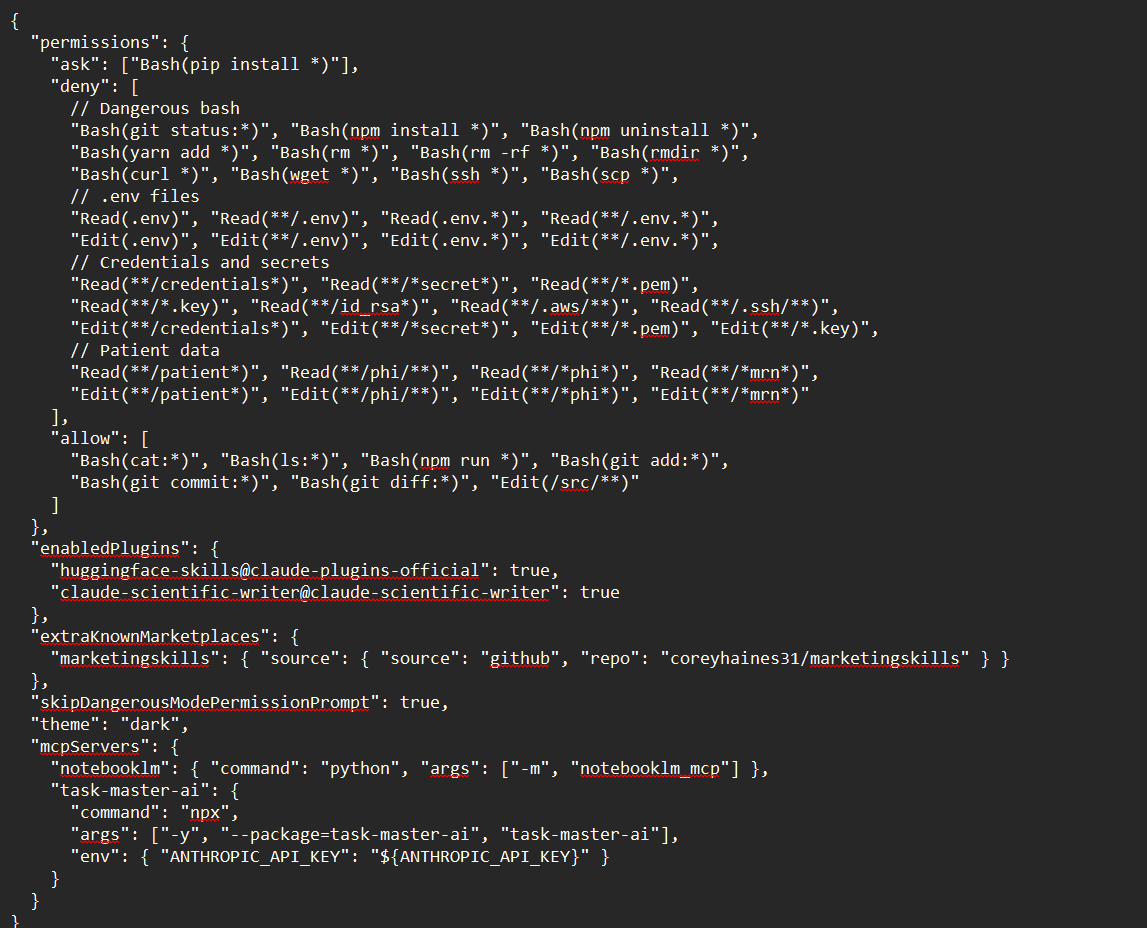
A reasonable starting settings.json for a non-clinical project looks like this. The clinical version comes a few pages down.
{
  "permissions": {
    "allow": [
      "Read",
      "Glob",
      "Grep",
      "Bash(git status)",
      "Bash(git diff:*)",
      "Bash(git log:*)",
      "Bash(npm test)",
      "Bash(npm run lint)",
      "Bash(pytest:*)",
      "Bash(Rscript -e:*)",
      "Bash(ls:*)"
    ],
    "deny": [
      "Read(./.env)",
      "Read(./.env.*)",
      "Read(./secrets/**)",
      "Read(./credentials/**)",
      "Read(./**/*.key)",
      "Read(./**/*.pem)",
      "Bash(rm -rf:*)",
      "Bash(git push --force:*)"
    ]
  }
}
💡 Tip. You do not have to type that JSON by hand. Inside Claude Code, ask: “Draft a
.claude/settings.jsonwith a sensible allow list for read-only git, pytest, and reading files, and a deny list that blocks.env,secrets/,credentials/,*.key,*.pem,rm -rf, andgit push --force. Show me before saving.” Claude writes the file and waits for you to approve.
.claude/settings.json with populated allow and deny arrays, syntax-highlightedWhat goes on the allow list
The allow list is the same idea as the formulary’s approved-drug list — actions you have decided in advance are safe, so they do not need a fresh approval every time. Things that belong here:
- Reading files in this project (
Read,Glob,Grep). - Running your test suite (
pytest,npm test,Rscript -e 'testthat::test_dir(".")'). - Running your linter or formatter.
- Read-only git commands —
status,diff,log,branch. - Starting a local development server that only listens on your own machine.
The criterion for the allow list: doing this action a hundred times in a row could not damage anything. If you are unsure, leave it on ask.
🧠 Remember. The
.claude/settings.jsonfile gets checked into the project’s git history, alongside the code. That means every teammate working on the same project picks up the same allow list. Configure once; the team gets it automatically.
What goes on the deny list
The deny list is the more important half of the system. The allow list saves keystrokes. The deny list prevents incidents.
Some things belong on the deny list of every project, no exceptions:
Read(./.env)and all its variants (.env.local,.env.production,.env.staging, etc.). The.envfile is where API keys, database passwords, and other secrets live by convention. Claude should never see one.Read(./secrets/**)— any folder explicitly namedsecrets.Read(./credentials/**)— same idea.Read(./**/*.key)andRead(./**/*.pem)— file extensions used for private cryptographic keys.Bash(rm -rf:*)— the command that recursively and permanently deletes files. There are legitimate uses; none of them belong on the allow list, and most belong with a human eyeball.Bash(git push --force:*)andBash(git push -f:*)— the commands that erase teammates’ commits from a shared branch.
Once a file is on the deny list, Claude cannot read it even if you explicitly ask. The agent does not see the contents; it does not include them in search results; it cannot accidentally paste them into a transcript. This is the layer that turns a careless prompt (“debug this connection issue”) into a non-event instead of a credential leak.
⚠️ Warning. A surprising number of
.envfiles end up in conversation transcripts because a developer said “Claude, help me figure out why this isn’t connecting to the database” and Claude helpfully read the.env. Once a credential is in the transcript, it has left your laptop and gone to Anthropic’s servers. Put the deny list in place before you have that thought. Treat it as you would the door on the controlled-substance cabinet — it lives between the wrong action and the wrong outcome.
The flag you should not turn on
There is a command-line flag called --dangerously-skip-permissions. It does exactly what it says. With that flag on, Claude Code does not stop to ask before doing anything. Write a file? Done. Run an arbitrary shell command? Done. Push to main? Done. No prompts.
Boris Cherny, who built Claude Code, has stated publicly that he never uses --dangerously-skip-permissions himself. The official recommendation, straight from the source, is to configure a settings.json allow list and keep the default ask mode for everything else.
⚠️ Warning. If the person who built the tool will not use the flag, you should think hard before using it. There are narrow situations where it is appropriate — sandboxed CI jobs, disposable containers, the overnight Ralph loops we cover in Chapter 18 inside an isolated worktree — and many situations where it is inappropriate. It is never the right default for interactive work on a project that matters.
If you absolutely must run unattended for a particular reason, pair the flag with isolation: a fresh worktree (Chapter 16), or the built-in sandbox (below). Never run it against the working copy of a project you care about.
The sandbox: the safer “run wild”
Claude Code ships with a built-in sandbox that uses operating-system-level isolation (Seatbelt on macOS, bubblewrap on Linux and inside WSL2 — it is not available on native Windows) to restrict what the commands Claude runs can touch. Inside the sandbox, a command can write only to the project folder and a temporary scratch area, and can reach only the network addresses you have approved. Everything else on the laptop is off-limits — enforced by the operating system itself, not by the model’s good behavior.
Turn it on from inside a session:
/sandbox
A panel opens where you choose how sandboxed commands are approved. The setting that matters for experimentation is auto-allow: sandboxed commands run without asking, because the boundary itself is doing the protecting. Anything that cannot run inside the boundary falls back to the ordinary permission prompt.
This is the right way to let Claude experiment. Try a refactor. Run a wild prototype. Let it install seven packages you have never heard of and see whether they work — the blast radius stays confined to the project folder. For full disposability, pair the sandbox with a worktree (Chapter 16), a throwaway copy of the project: review the diff at the end, carry over the parts you want, delete the rest.
💡 Tip. The sandbox together with a worktree (Chapter 16) is the standard recipe for “I want Claude to work autonomously without supervising every keystroke.” Two layers of isolation, both trivial to throw away. Real changes get explicitly merged back; they never happen automatically.
Permission modes
You can also switch the whole session into one of four modes, without editing settings.json for every command. Press Shift+Tab inside a session to cycle through them.
default— ask before risky actions, allow list applies. The mode you should start in.plan— Claude can read and think and propose a plan, but cannot write or run anything. The right mode for design conversations. We use it heavily in Chapter 9.acceptEdits— auto-approve file edits, still ask before bash commands. A common middle ground for experienced users in trusted projects.bypassPermissions— same as--dangerously-skip-permissions. Same warnings.
Or set a starting mode in settings.json, using the defaultMode key inside the permissions block:
{
  "permissions": {
    "defaultMode": "plan"
  }
}
That example makes every new session in the project open in plan mode until someone deliberately switches out of it — a sensible house rule for a repository where reading should always precede writing.
What to do if Claude touches something it should not
Even with a good settings.json, accidents happen. Maybe a deny rule was missing. Maybe a teammate hand-typed a path with a typo. Maybe Claude was asked to do something subtle and got it almost-right in a damaging way. Here is the incident-response order, in plain steps. Print this somewhere if you are nervous.
- Stop the session. Press
Ctrl+Ctwice. Do not type “undo” into the prompt — you are not sure the agent will interpret that correctly, and continuing to talk to it can make things worse. - Identify what was touched. Run
git statusandgit diffin the terminal. If the project is under version control, those two commands tell you every file that changed since the last clean state. - If a credential was exposed (an API key, a database password, an Azure connection string), rotate it immediately. Log into the relevant console (Anthropic, Azure, Databricks), revoke the old credential, generate a new one, and update wherever the credential is legitimately used. Do this before you fix anything else. A leaked credential is the fastest-clock damage.
- If the change was to a git-tracked file, run
git checkout -- <filename>to revert that file to the last committed state, orgit reset --hard HEADto revert all uncommitted changes. (Use the second one carefully — it discards all uncommitted work, not just the agent’s.) - If the change was to data outside git (e.g. a CSV, a database row, a sent email), the recovery path depends on the data. Restore from your most recent backup. If you do not have one, this is when you learn the value of backups.
- Audit git history if there is any chance a credential was committed. The command
git log -pshows every change ever made. The commandgit log -S '<secret string>'searches the entire history for a particular leaked string. If a credential made it into a commit, even one that was reverted, treat the credential as permanently exposed and rotate it. - Notify your supervisor and the AI Office if any patient data may have been touched. This is the same protocol you would follow for any other near-miss in the hospital. Do not wait. Same-day disclosure is always better than later disclosure.
🧠 Remember. A near-miss reported is a system that gets better. A near-miss hidden is a near-miss that will happen again to someone else.
The KHCC and AI Office non-negotiable rules
Inside KHCC, where the AI Office pipelines from Chapter 0.5 run against real patient data, the rules above are tightened. Some of them are not negotiable.
- Never put
aidi_catalogSQL on the allow list. Every Databricks SQL statement against the catalog deserves a human eyeball, every time, no exceptions. - Never put
dbo.eval_runsor any shared eval table on the allow list. A typo there silently corrupts the baseline against which every other pipeline is graded. - Always deny
.env,*.key,*.pem,credentials/**, andsecrets/**. No project, no exception, no excuses. - Always deny
data/patients/**,data/raw/**, and any folder that could contain raw PHI — patient names in plaintext, MRNs not yet Optimus-encoded, anything that left VistA without going through the silver layer. - Never use
--dangerously-skip-permissionson a Databricks driver node or any compute environment with line of sight toaidi_catalog. Headless production work against the AI Office runs through reviewed, gated jobs (Chapter 17), not interactive YOLO. - Never log MRNs or names in plaintext anywhere — not in console output, not in error logs, not in email subjects. Optimus-encode MRNs. Fernet-encrypt names. The deny list should at least block reading any local CSV that contains raw names from a temporary export.
⚠️ Warning. A pipeline that silently skips a deceased-patient eval case because of a missing column is worse than a pipeline that crashes loudly. The same logic applies to permissions: a permission rule that silently auto-approves a destructive command is worse than one that interrupts you. When you are uncertain, gate it.
A starter settings.json for AI Office work looks something like this:
{
  "permissions": {
    "defaultMode": "default",
    "allow": [
      "Read",
      "Glob",
      "Grep",
      "Bash(git status)",
      "Bash(git diff:*)",
      "Bash(git log:*)",
      "Bash(pytest:*)",
      "Bash(Rscript -e:*)",
      "Bash(ls:*)"
    ],
    "deny": [
      "Read(./.env)",
      "Read(./.env.*)",
      "Read(./secrets/**)",
      "Read(./credentials/**)",
      "Read(./data/patients/**)",
      "Read(./data/raw/**)",
      "Read(./**/*.key)",
      "Read(./**/*.pem)",
      "Bash(rm -rf:*)",
      "Bash(git push --force:*)",
      "Bash(git push -f:*)",
      "Bash(dbx deploy:*)",
      "Bash(databricks jobs run-now:*)"
    ]
  }
}
Adjust the allow list per project. The deny list is the floor — add to it, never subtract.
🔧 Technical Stuff. The patterns in
allowanddenyuse a simple glob-like syntax.Bash(git diff:*)permits anygit diffinvocation.Read(./.env.*)matches.env.localand.env.production— but not the bare.envfile itself, which is why the examples listRead(./.env)as a separate rule. The**wildcard matches any number of folders deep. If you are uncertain whether your pattern matches what you intended, type the command into Claude Code and look at what the permission prompt asks for — the prompt names the exact rule to add.
Try This
Open any project you are already working in. Run /permissions inside Claude Code and look at the current state. If you have never configured this, the lists will be empty.
Then ask Claude:
Draft a
.claude/settings.jsonwith a sensible allow list for read-only git commands, pytest, and reading files. The deny list should block.env,.env.*,secrets/**,credentials/**,*.key,*.pem,rm -rf, andgit push --force. Show me the file before you save it.
Read what it produces. Adjust to taste. Save it. Commit it. Push it to the team’s shared repository so the next clinician who clones the project gets the same protections.
Watch Out
Do not allowlist Bash(*). People do this when the prompts get annoying. It defeats the entire system: you have just promoted Claude to root on your project. If you ever feel the urge to reach for a wildcard allow, that is the signal that you should be in plan mode for a while, not the signal that the allow list needs to be looser. The constraint is the safety. Keep it.