Chapter 11: Slash Commands
A slash command is a shortcut you type starting with a forward slash. Type /clear instead of “please discard our conversation so far and start a clean session.” Type /cost instead of “how much have I spent in this session.” A slash command is the keyboard equivalent of the order-set buttons in the EMR: one click (one keystroke) does the thing you would otherwise have to spell out.
Some slash commands are built into Claude Code from day one. Others you write yourself, and they live in a folder inside your project. Both kinds work the same way: you type a forward slash, you pick the command from the menu that appears (or finish typing the name), you press Enter, and Claude does the thing.
After a week of using Claude Code seriously, your fingers will learn three or four of these the way they already know Ctrl-C. That is the goal.
🧠 Remember. A slash command is just a shortcut. You are not learning a new programming language; you are learning a small set of typed buttons.
The Built-In Commands Worth Knowing
There are dozens of built-in slash commands. You do not need to memorize them. Typing /help at any time will list them. Here are the ones that matter for daily work, grouped by purpose.
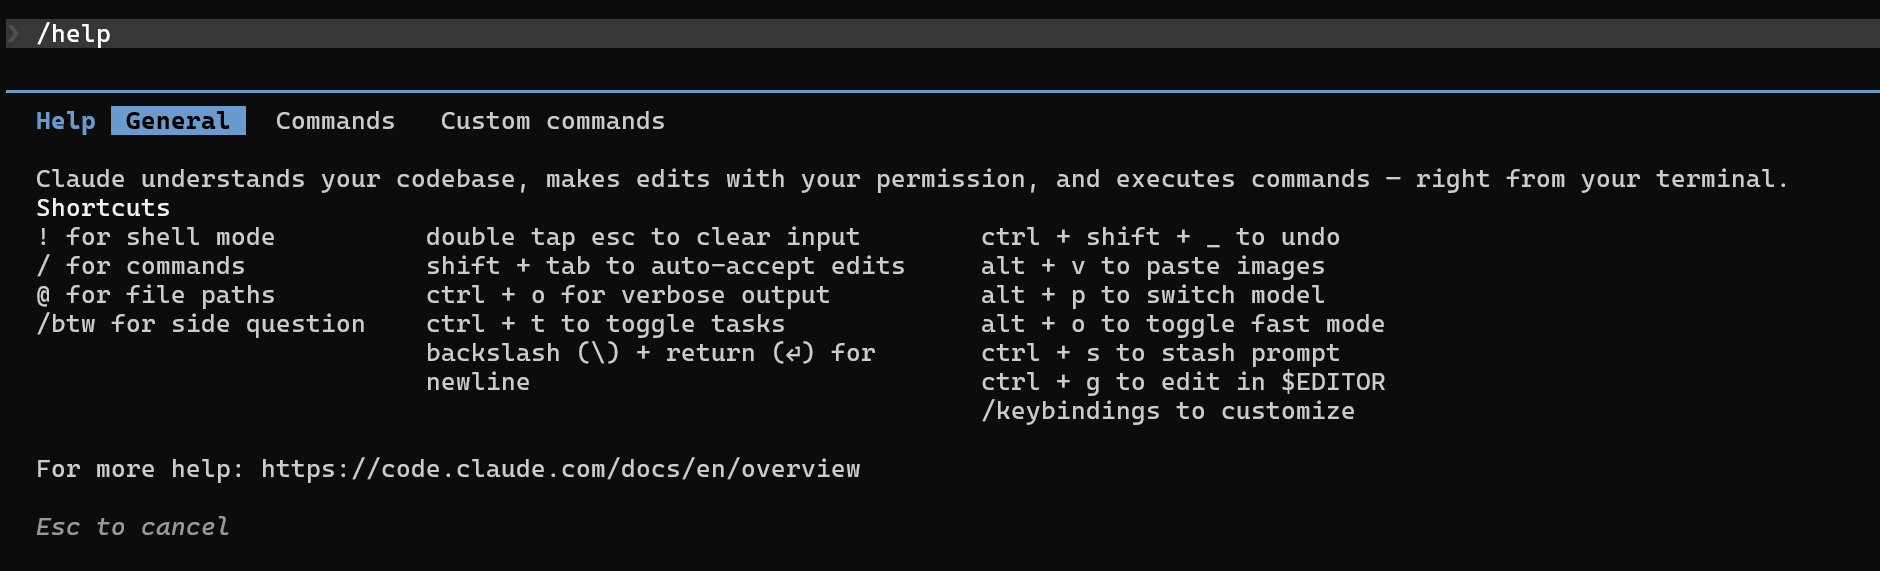
/help in Claude Code listing every available slash command, built-in and customSession control
/init— Look at this project and write a starterCLAUDE.md. Run it once when you start a new project. Then cut the result in half (see Chapter 10)./clear— Wipe the current conversation and start fresh. Use this between unrelated tasks. A short, focused conversation beats a long messy one./compact— Summarize what you have done so far and keep going with less baggage. Use this when a session is getting long but you do not want to lose your place. You can guide it:/compact focus on the SQL changeskeeps the parts you care about./rewind— Jump back to an earlier point in the conversation. Claude saves a snapshot before every edit, and/rewindopens a list and lets you restore either the code, the conversation, or both. Think of it as Ctrl-Z for an entire session.
Cost and model
/cost— How much have you used this session? On API billing it is a dollar figure; on a Pro or Max plan it shows your usage against the plan’s limits. (/cost,/usage, and/statsare views of the same screen.)/stats— The detailed tab of that screen: activity statistics and usage broken down by model and by what consumed it./model— Switch which Claude model is doing the work./model haikufor cheap, fast tasks;/model sonnetfor normal work;/model opusfor the hard ones. Model names change every few months;/modelwith no argument always shows the current menu.
Configuration
/config— Open the settings panel. Pick your output style once and forget about it./permissions— Manage what Claude is allowed to do without asking you each time. You can allowlist safe commands (npm test,git status) so Claude does not interrupt you every five minutes for permission./statusline— Install a small bar at the bottom of your terminal showing your current folder, git branch, and how much of the context window is in use. Once you have it you will not work without it./help— The full list. When you forget, this is the answer.
Productivity
/btw— Open a small side-thread for a quick question that does not belong in your main work. “By the way, why does this function take a list and not a set?” Ask, get the answer, your main conversation is undisturbed./voice— Push-to-talk dictation. Speaking a prompt often produces a better prompt than typing one; you naturally add more context./sandbox— Toggle sandboxed execution: Claude’s shell commands run in an isolated environment with restricted access to your files and network. Useful when you want to let Claude experiment more freely. Available on supported platforms — check/help./agents— List and manage the subagents you have set up (Chapter 13).
🧠 Remember. The two most important built-in commands are
/clearand/compact. They are the difference between a productive day and a session that slowly turns into confused mush. Use them aggressively, and especially when you switch from one unrelated task to another.
💡 Tip.
/rewindis the most underused command in Claude Code. If a conversation has gone off the rails, do not argue with Claude for ten minutes trying to steer it back. Hit/rewind, pick the point right before the mistake, and try a different angle.
Custom Slash Commands: Just a Markdown File
The built-in commands are useful, but the real power is that you can write your own. There is nothing to install and nothing to register. A custom slash command is a markdown file dropped into a folder. The filename (without the .md) is the command name. The contents of the file are the instructions Claude will receive when you type that command.
That is the entire system. A file is a command.
The folder is .claude/commands/ at the root of your project. If you make .claude/commands/standup.md, you now have a /standup command. If you make .claude/commands/run-aidi-eval.md, you have /run-aidi-eval.
💡 Tip. Custom commands committed to the project’s git history are shared with the whole team. Custom commands in
~/.claude/commands/are personal — they follow you across projects but nobody else gets them.
A Minimal Example: /commit
Here is a small custom command for making a git commit. Save this as .claude/commands/commit.md:
---
allowed-tools: Bash(git add:*), Bash(git status:*), Bash(git commit:*), Bash(git diff:*)
argument-hint: [message]
description: Create a git commit with context
---

## Context

- Current git status: !`git status`
- Current git diff: !`git diff HEAD`
- Current branch: !`git branch --show-current`
- Recent commits: !`git log --oneline -10`

## Your task

Based on the above changes, create a single git commit.

If a message was provided via arguments, use it: $ARGUMENTS

Otherwise, analyze the changes and create a conventional commit message:
- `feat:` for new features
- `fix:` for bug fixes
- `refactor:` for code refactoring
- `test:` for adding tests
- `docs:` for documentation changes
Three things in that file are worth understanding.
The block at the top, between the --- lines, is called the frontmatter. It is configuration for the command. allowed-tools is the list of shell commands the slash command is pre-approved to run without asking you each time. argument-hint is what shows up in the menu telling the user what to type after the command name. description is what shows in the slash-command picker.
The lines with the ! prefix run as shell commands before Claude even sees the prompt. Their output gets pasted into the prompt itself. So !git status`` runs git status on your computer, and the output is included in what Claude reads. This is how you give Claude the current git diff without having to copy and paste it.
$ARGUMENTS is a placeholder. Whatever you type after the slash-command name gets substituted in. If you type /commit fix the AKI null handling, the string fix the AKI null handling ends up where $ARGUMENTS is.
🔧 Technical Stuff. The
!shell expansion and the$ARGUMENTSsubstitution happen on your laptop, before the prompt is sent to Claude. They are nearly free in terms of cost — the only token cost is the shell output itself, not the substitution machinery.
A KHCC Custom Command: /run-aidi-eval
Here is the command that earns its keep in AI Office work. The deceased-patient eval cohort is the gate every prompt change must pass before it ships (see Chapter 0.5 if that phrase is unfamiliar — it is the frozen reference dataset of about 1,000 deceased patients with hand-curated ground truth, and every clinical pipeline at the AI Office is graded against it). Running the eval suite by hand is several steps: trigger a Databricks job, wait for it to finish, query the results table, compare against the previous run, decide pass or fail. You do not want to type that out every time.
Save this as .claude/commands/run-aidi-eval.md:
---
allowed-tools: Bash(databricks jobs run-now:*), Bash(databricks jobs get-run:*)
argument-hint: [pipeline-name]
description: Run the deceased-patient eval suite against a pipeline and report results
---

## Context

- Pipeline under test: $ARGUMENTS
- Eval cohort: `aidi_catalog.dbo.eval_cohort` (frozen deceased-patient set)
- Results table: `aidi_catalog.dbo.eval_runs`

## Your task

1. Trigger the Databricks eval job for the pipeline `$ARGUMENTS`. Use the job ID
   mapped in `docs/eval-jobs.json`.
2. Poll the run until it completes (status `TERMINATED`).
3. Query `aidi_catalog.dbo.eval_runs` for the latest run of `$ARGUMENTS` and
   compare against the previous run on the same pipeline:
   - Accuracy delta
   - Precision/recall delta
   - Any new failure cases (rows where `prev_pass = true AND new_pass = false`)
4. Report:
   - Pass/fail summary
   - Regressions (must be zero to ship)
   - Any new wins
5. Do NOT modify any prompt or pipeline code. This command is read-only.

## Acceptance

If there are any regressions, the output must start with `EVAL FAILED`.
If zero regressions, start with `EVAL PASSED`.
Now anyone on the team types /run-aidi-eval pathology-v6 and gets back a clean pass-or-fail with a diff against the previous run. The whole workflow — which job to trigger, which table to query, what counts as a regression, how the output should be formatted — lives inside the command. Nobody has to remember the details.
⚠️ Warning. Custom commands that run shell commands are powerful, which means they can also be dangerous. Always set
allowed-toolsto the narrowest list possible. A command that allowsBash(*)(any shell command at all) can dorm -rfon your repository when Claude takes a creative interpretation of your prompt. Be specific.
Two More Examples Worth Stealing
A /optimize command that reviews code for performance:
---
description: Analyze code for performance issues and suggest optimizations
---

# Code Optimization

Review the file(s) I just shared for the following, in priority order:

1. **Performance bottlenecks**: O(n²) operations, inefficient loops, repeated work.
2. **Memory issues**: unreleased resources, large intermediate copies.
3. **Algorithm improvements**: better data structures, vectorization opportunities.
4. **Caching opportunities**: repeated computations that could be memoized.

For each finding, output:
- Severity (Critical / High / Medium / Low)
- Location (file:line)
- Explanation
- Recommended fix, with a code example
A /standup command that summarizes what you did yesterday:
---
allowed-tools: Bash(git log:*)
description: Summarize yesterday's work for the morning standup
---

## Context

Recent commits: !`git log --since=yesterday --oneline --author="$(git config user.email)"`

## Your task

Summarize the work above in three to five bullets suitable for a morning
standup. Lead with what shipped, follow with what is in progress, end with
any blockers I should raise.
Notice that none of these involve any new programming. They are just prompts saved to a file. The file is the command.
💡 Tip. The fastest way to learn custom commands is to copy good ones from open repositories. The community has converged on a small set —
commit,pr,optimize,standup,review— and they are easy to adapt. Find one close to what you want, change a few lines, save it under.claude/commands/.
Where Custom Commands Live
.claude/commands/<name>.md— Project-level. Lives in your project’s folder, gets checked into git, the whole team gets it.~/.claude/commands/<name>.md— Personal. Lives in your home folder, follows you everywhere, nobody else sees it.
If a project-level command and a personal one share a name, one shadows the other — in current versions the personal file wins, but do not build on that; give them different names. The convention is: team workflows go in the project; your personal shortcuts go in your home folder. (Newer versions of Claude Code treat custom commands and skills — Chapter 12 — as one system under the hood; your .claude/commands/ files keep working either way.)
Try This
- Type
/helpinside Claude Code and read the list. Pick three built-in commands you did not know existed. Try them once each. - Run
/costafter your next hour of work. Note the number. Run/clear. Notice how the next prompt feels different on a clean session. - Make
.claude/commands/standup.mdusing the example above. Run it tomorrow morning and see what comes back. - Adapt the
/commitexample for your project’s commit message style. Use/commitfor the next week instead of typing commit messages by hand.
Watch Out
- Do not over-allow tools.
Bash(*)is not a permission, it is a security hole. Be specific:Bash(git status:*),Bash(npm test:*). The narrower the allowlist, the safer the command. - Do not put secrets in
!shell commands. Anything youcatinto a prompt becomes part of the conversation and may end up in logs. API keys do not belong in slash commands. - Do not make a slash command for a one-time task. If you are only going to do it once, just type the prompt. A command pays for itself the second time you use it.
- Do not forget to commit
.claude/commands/. The whole point of project-level commands is that the team shares them. If they only live on your laptop, you have just reinvented the personal shortcut. - Do not name a custom command after a built-in. Core commands like
/clearand/compactcannot be overridden; your same-named file is ignored at best and confusing at worst. Pick a distinct name.